How to Control a Servo Motor with Arduino
Author: Ihechikara Abba

In this article, you’ll learn how to connect and control a servo motor with an Arduino board. Servo motors are popularly used for prototyping robotics parts or projects that require mechanical motion in fixed, specific angles (in this case, 0 to 180 degrees).
You’ll learn how to connect a servo motor to an Arduino board, how to control the motor using code, and how to use a for loop to create a sweeping motion.
Let’s get started!
Hardware Components
- Arduino board.
- Servo Motor.
- Jumper wires.
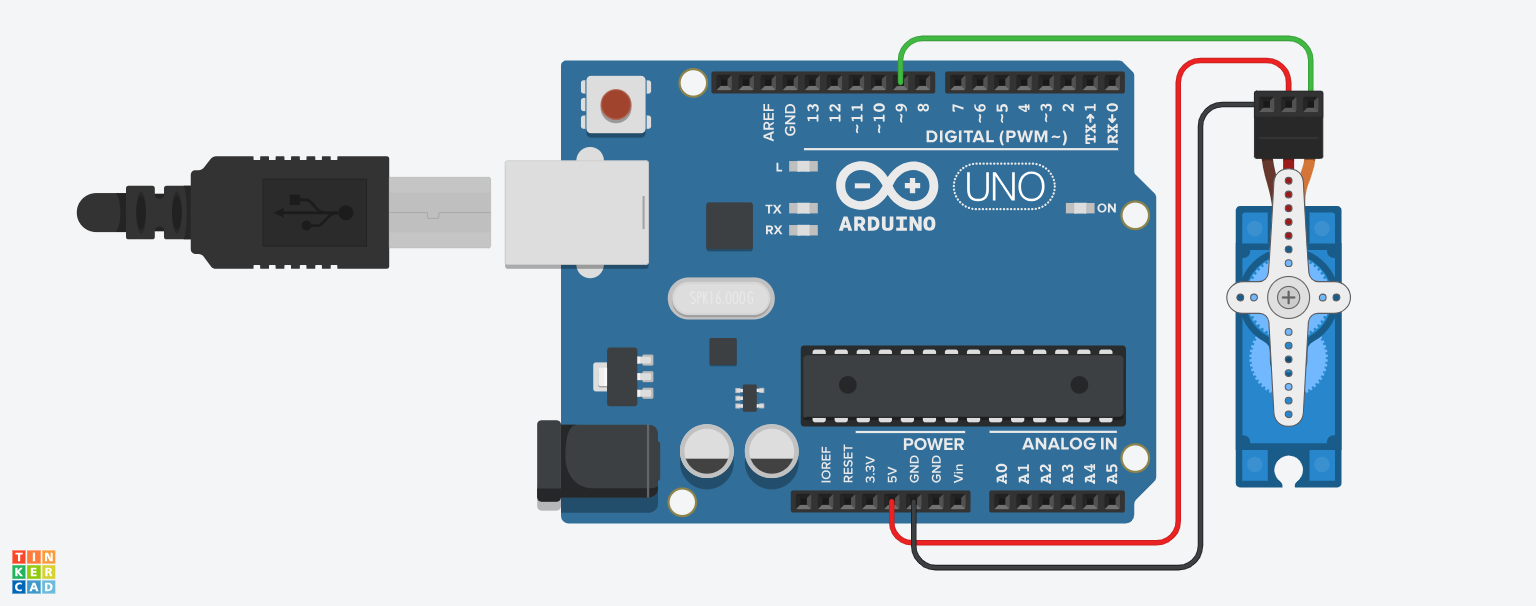
Circuit Diagram
You should have a circuit connection similar to this:

Here’s how to make the connections above:
- Connect the red wire of the servo motor to 5V.
- Connect the black (this may be brown for you) wire to GND.
- Connect the yellow wire to a digital pin. For this tutorial, we’ll use pin 9.
How to Control a Servo Motor
In order to control the servo motor, you have to make use of the built-in Servo library. This library comes with the Arduino IDE, so no extra installations are required.
Servo Motor Example #1
First, let’s see how you can use code to interact with the hardware connections. Here’s what the code looks like:
#include <Servo.h>

Servo myServo;

void setup() {
  myServo.attach(9);
  myServo.write(100);
}

void loop() {
}
Let’s break down the code.
We started by “including” the Servo library. This gives you access to the library’s methods: attach(), detach(), write(), and so on.
#include <Servo.h> We then created a new instance of the Servo class called myServo:
Servo myServo; Next, we specified that the servo motor was connected to pin 9 on the Arduino board using the attach() function:
myServo.attach(9);Lastly, we used the write() function to move the servo motor to an angle of 100 degrees:
myServo.write(100);When you upload the code, your motor should move to an angle of 100 degrees.
This example shows how to use code to interact with the servo motor. In the next section, you’ll simulate a sweeping motion with the servo motor.
Servo Motor Example #2 — Servo Sweep Example
In this example, we’ll simulate a sweeping motion with the servo motor by moving it from 0 to 180 degrees and then back from 180 to 0 degrees in a continuous loop.
Here’s the code:
#include <Servo.h>

Servo myServo;

void setup() {
  myServo.attach(9);
}

void loop() {
  for (int pos = 0; pos <= 180; pos++) {
    myServo.write(pos);
    delay(15);
  }
  for (int pos = 180; pos >= 0; pos--) {
    myServo.write(pos);
    delay(15);
  }
}
We started by including the Servo library, creating a new instance of the Servo class called myServo, and attaching pin 9 to the servo motor:
#include <Servo.h>

Servo myServo;

void setup() {
  myServo.attach(9);
}
In the loop() function, we created two for loops:
void loop() {
  for (int pos = 0; pos <= 180; pos++) {
    myServo.write(pos);
    delay(15);
  }
  for (int pos = 180; pos >= 0; pos--) {
    myServo.write(pos);
    delay(15);
  }
}
The first loop turns the servo motor from 0 to 180 degrees with a delay of 15 milliseconds. Without the delay, the motor will move rapidly, so you have some sort of delay to have a smoother motion.
The second loop does the same thing, but in the opposite direction: it turns the motor from 180 to 0 degrees.
Use Cases
Some of the use cases for servo motors in Arduino include:
- Robotic arms and joints.
- Radar and object detection systems.
- Simulating analog displays like range of temperature, speed, and so on.
- Automated opening and closing mechanisms.
- Automated feeding systems, and so on.
Conclusion
In this article, you learned about servo motors in Arduino. You started by learning how to connect a servo motor to an Arduino board.
Then you learned how to write code to control the motor connected to a board. You also learned how to use the Servo library to send signals and control the angle of the motor.
Lastly, you learned how to simulate a sweeping motion using for loops.
Happy Coding!
Tag(s):